Growers can find information about best practice in the seasonal orchard activity section below. The correct timing of key orchard management practices is important to achieve a high yields of good quality fruit. The following information highlights some key orchard management activities with recommended timings within each season. Information and links are reviewed regularly and updated with information from research trial results, published literature as well as grower and consultant input.
Orchard management checklist
Basic requirements for avocado production
| - No more than a couple of mild frosts per year - Free draining soil - Flat or northern aspect with good sunlight - Adequate shelter from wind |
Spring
Growth stages
September
- Flower buds start to swell and develop.
October – November
- Flowers start to open, are pollinated and fruitlets start to become visible.
- New red vegetative shoot growth is produced.
- Roots are often flushing activiely.
- Carbohydrate stores begin to be depleted to support flower and new leaf development.
For a video of the phenology of a regular bearing tree, visit the link here.
For a video of the phenology of a irregular bearing tree, visit the link here.
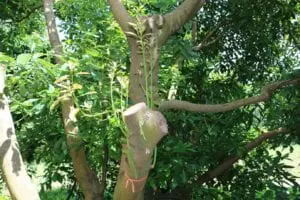
August - early September | Inject sick trees with phosphonate to protect trees from Phytophthora
Trees with moderate to severe Phytophothora root rot will benefit from a spring application of phosphonate in addition to the autumn application.
- Root test before and 6-8 weeks after injection
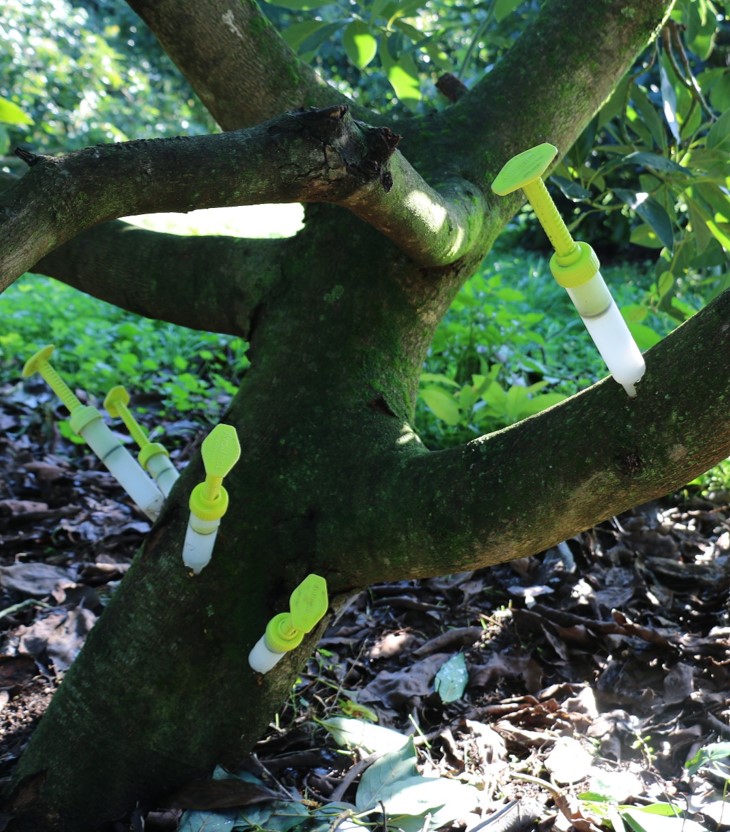 If higher than 90mg/kg roots at 75% moisture don’t inject
- Expect levels of 25 – 45mg/kg at 75% moisture after injection. Higher is ok.
- Use 15% working solution of phosphonate
- 20ml per meter of canopy diameter
- Space syringes evenly
- Don’t inject sick trees with more than recommended dose.
Further resources on projection of Phytopthrora
5-10% flowering | Bring in bees
- Monitor flowering.
- Flowers about to open are more rounded compared to those that have already opened.
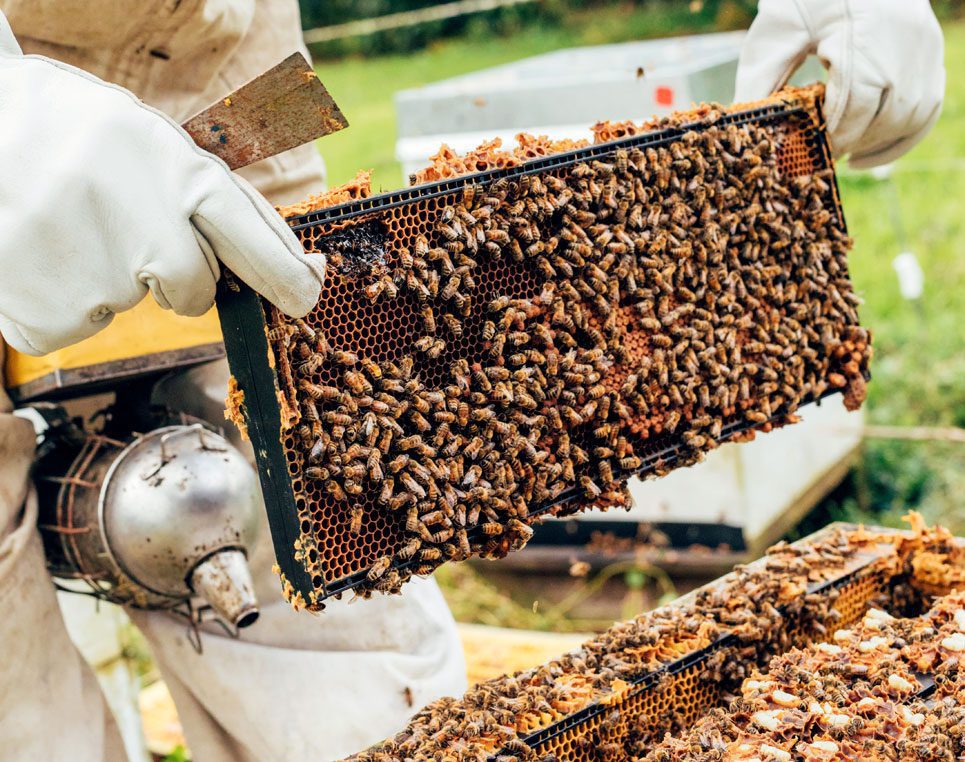
- Bring in bees when 5-10% flowers have opened.
- 8-10 hives per hectare is best practice. If you have alot of flower and expect good spring weather 4-6 hives/ha probably ok. More bees the better.
- Bees won’t fly in less than 17°C, windy days or very cloudy days.
- Pollenisers will help with female/male overlap which is important in marginal climates.
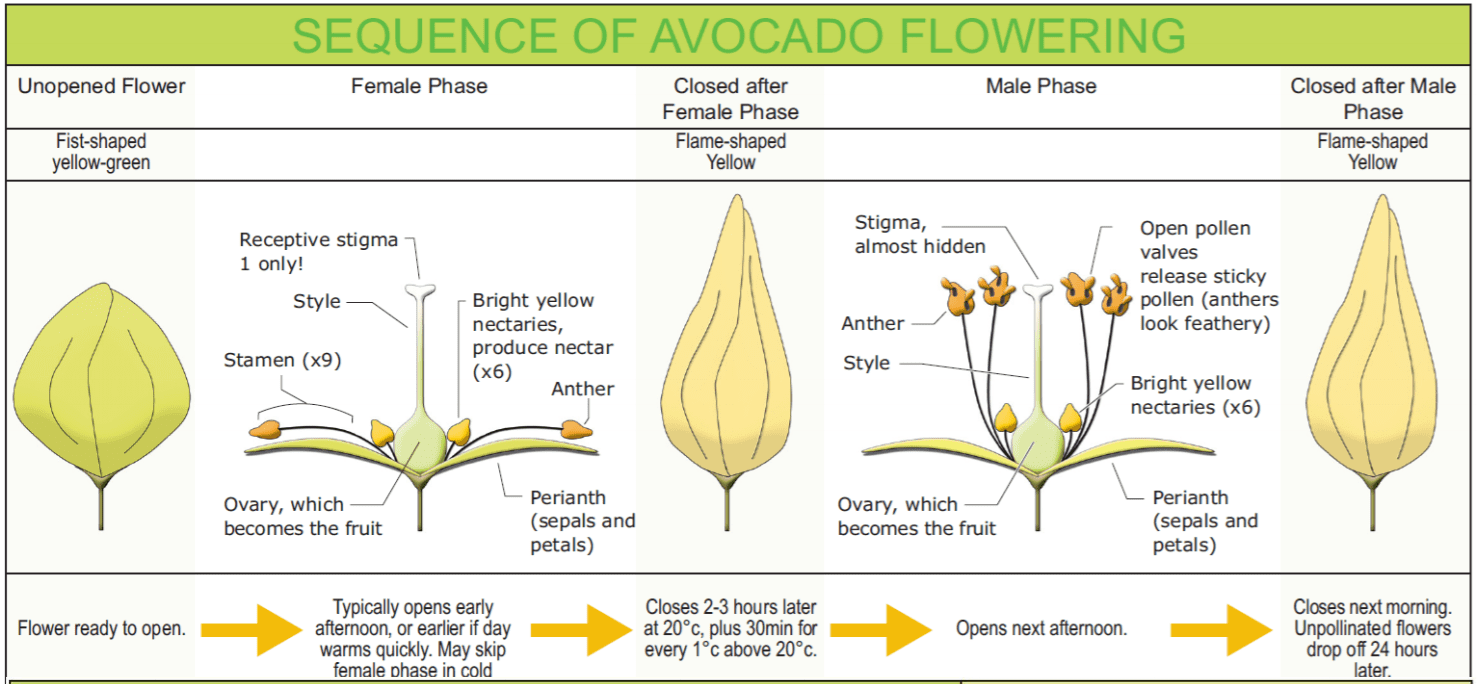
- Unopened flowers are quite plumb or rounded
- Flowers that have opened and closed are more pointed
- Female phase flowers have stamen and anthers more flat against sepals and petal whereas male flowers have more upright stamen and the anthers may have a feathery look as they present the pollen.
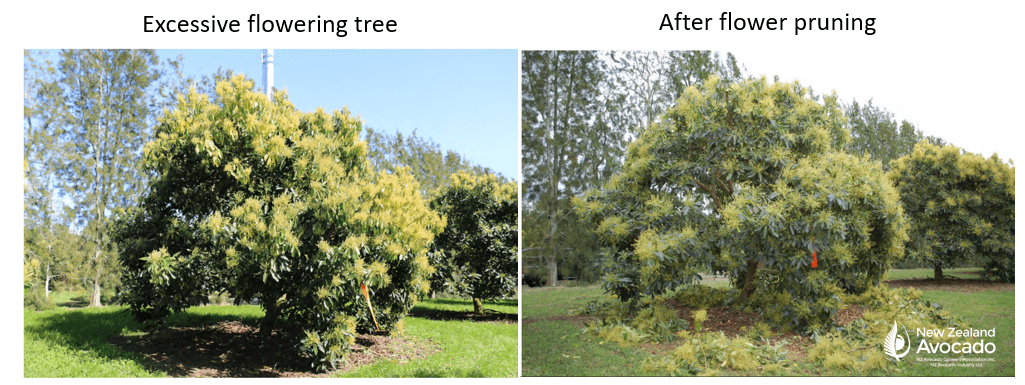
September - October | Flower prune excessively flowering trees
Excess crop load reduces return crop with early intervention key to mitigation
For a video about crop load management to reduce irregular bearing, visit the link here.
- Too much flower is not a good thing but is common if the trees haven’t held much crop.
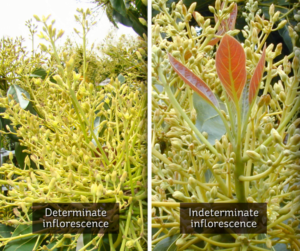
- Allowing the tree to set excessive fruit will deplete valuable resources that could be used to support fruit sizing, spring leaf flush and next years flowering.
- The earlier you can prune excess flower off the better but it can be easier to leave until October when new leaf flush is more visible. This will make it easier to target determinate infloresences that lack new leaf.
- A balance of 60% determinate and 40% indeterminate is ideal.
What to target
Cut back to healthy foliage and target flower likely to set fruit in exposed area prone to sunburn and wind damage.
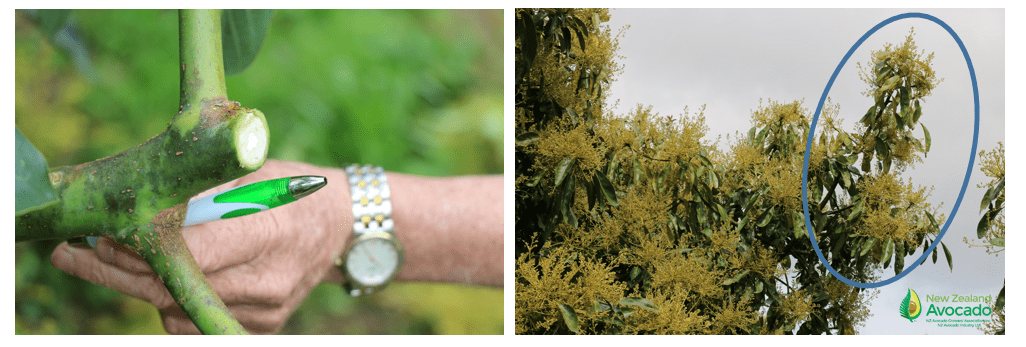
What to expect
- Increased fruit size in year 1 with slight drop in yield
- Similar fruit size in year 2 with much higher yield from trees flower pruned compared to those that weren’t.

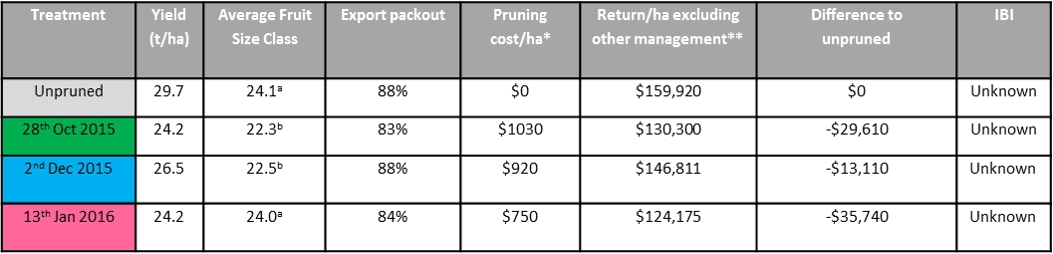
Year 2 results of a flower and fruitlet removal trial looking at the effect the timing of crop load reduction has on return crops. Trial was run from 2015- 2017 and was carried out on a Katikati orchard in the Bay of Plenty.
November | Apply mulch
- 10cm is an ideal mulch thickness. Apply additional mulch if exisiting mulch is not adequate.
- Avocado leaf is best mulch type but chiped avocado pruning is great as well. Coarse wood chip, bark or shelter prunings is ok as well.
- Any non-avocado material to be used as mulch should ideally be aged for 6 – 12 months before applying to trees.
October - November | Plant trees
- It’s ok to plant trees anytime if protected appropriately from frost, sun and wind.
- Review the updated planting guide on how to take delivery of trees, inspect them, plant and care during early development.
- Plant trees as soon as practical after delivery.
- Plants will get going once they have recovered from transplant shock and once temperatures are warm enough.
- Follow planting guidelines and avoid over watering.
- If replanting avocados into and existing avocado orchard it is storngly advised to replant with a clonal rootstock with tolerance to Phytophthora root rot.
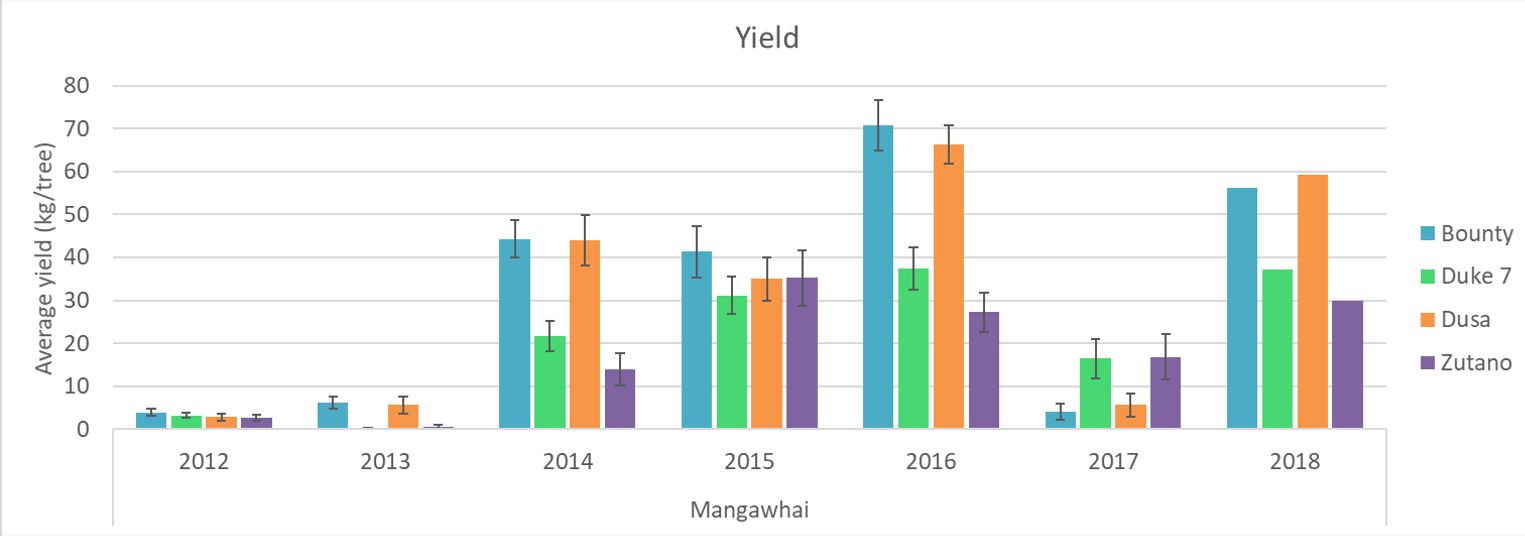
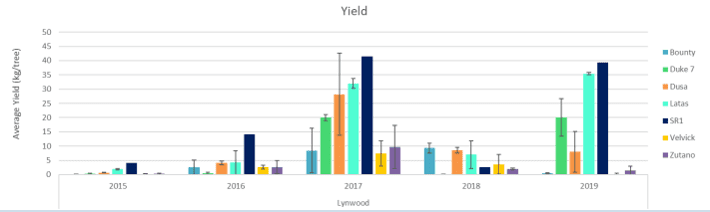
- SR1 and Latas rootstocks are performing well in Whangarei cultivar trial but perforamnce is unknown in Bay of Plenty and Far North yet.
For more information on the different rootstocks available and their performance in different trials click here.
Ongoing | Monitor soil moisture and use spring irrigation trigger points
- Ideal mulch depth is 10cm of avocado leaf or coarse mulch material
Use soil moisture monitoring to inform irrigation
Install soil moisture monitoring on the Northern (Sunny) side of a representative tree in the block being irrigated. Probes should be half way between trunk and the drip line of the tree and in a spot that irrigation reaches if the orchard is irrigated.
If using tensiometers such as Irrometer or TenTek brands
- Use 15cm probe for irrigation trigger (i.e. start irrigation system when readings below are reached)
- Bay of Plenty = -30kPa
- Whangarei = -50kPa
- Far North = -20 to -25kPa
- Use a 30cm probe to inform sprinkler volume per hour and/or length of irrigation
- Applying 20 – 30mm of water per irrigation is a good starting point
- Work out how many mm of water your sprinklers apply using the formula (mm/hour =(sprinkler volume L/hr) ÷(π X radius of sprinkler throw²)
- e.g sprinkler head delivering 100L/hr with a radius of 4m
- mm/hr = (100) ÷ (3.142 X 4²)
- mm/hr = 100 ÷ 50.3
- 1.99mm/hr
- So a 100L/hr sprinkler with a throw of 4m radius will deliver 1.99mm of water every 1 hour the irrigation system is run. To deliver 20mm of water the irrigation system would need to be run for 10 hours.
- If the 30cm probe is drying beyond the trigger point before the 15cm probe → increase volume of water by changing sprinkler head to higher flow rate or irrigating for longer.
- If the 30cm probe is reading a lot lower than the 15cm probe indicating the soil at 30cm is alot wetter than the 15cm soil → Decrease volume of water delivered at each irrigation by changing sprinkler head to lower flow rate or irrigate for a shorter period. You may need to increase frequency of irrigation events but decrease the volume of water delivered at each irrigation.
- Addition of mulch up to acheive a depth up to 10cm will help retain moisture in top 15cm of soil.
For more information relating to, irrigation, optimum use, consent, good management and rules, visit the link here
For free access to Irrigation NZ resources, visit the link here.
Summer
Growth stages
December
- Trees should have multiple clearly visible sites of new red/green vegetative flush about 20cm or longer.
- Fruit sizes from ‘pin-head’ to pea size.
- Trees will shed a proportion of fruitlets.
- Developing fruit and leaves continue to deplete carbohydrate reserves in the tree.
January – February
- New spring leaves start to harden off to a dark green.
- Fruitlets size rapidly and begin to hang downwards. They may start to disappear into the growing leafy canopy if there has been sufficient flush.
- Some fruit will drop through this period. Fruit drop is common as the tree regulates the amount of crop to carry.
- Carbohydrate stores continue to be depleted through this time.
For a video of the phenology of a regular bearing tree, visit the link here.
For a video of the phenology of a irregular bearing tree, visit the link here.
December - February | Irrigate based on soil moisture monitoring
- Mulch can help retain soil moisture and reduce the need to irrigate. An ideal mulch depth is 10cm of avocado leaf or coarse mulch material
- Use soil moisture monitoring to understand water needs and inform irrigation.
Install soil moisture monitoring on the northern (sunny) side of a representative tree in the block being monitored. Probes should be half way between trunk and the drip line of the tree and in a spot that irrigation reaches if the orchard is irrigated.
If using tensiometers such as Irrometer or TenTek brands
- Use 15cm probe for irrigation trigger (i.e. start irrigation system when readings below are reached)
- Bay of Plenty = -25kPa
- Whangarei = -40kPa
- Far North = -15 to -20kPa
- Use a 30cm probe to inform sprinkler volume per hour and/or length of irrigation
- Applying 20 – 30mm of water per irrigation is a good starting point
- To work out how many mm of water your sprinklers are applying, use the formula (mm/hour =(sprinkler volume L/hr) ÷(π X radius of sprinkler throw²)
- e.g sprinkler head delivering 100L/hr with a radius of 4m
- mm/hr = (100) ÷ (3.142 X 4²)
- mm/hr = 100 ÷ 50.3
- 1.99mm/hr
- So a 100L/hr sprinkler with a throw of 4m radius will deliver 1.99mm of water every 1 hour the irrigation system is run. To deliver 20mm of water the irrigation system would need to be run for 10 hours.
- If the 30cm probe is drying beyond the trigger point before the 15cm probe → increase volume of water by changing sprinkler head to higher flow rate or irrigating for longer.
- If the 30cm probe is reading a lot lower than the 15cm probe indicating the soil at 30cm is alot wetter than the 15cm soil → Decrease volume of water delivered at each irrigation by changing sprinkler head to lower flow rate or irrigate for a shorter period. You may need to increase frequency of irrigation events but decrease the volume of water delivered at each irrigation.
- Adding mulch to acheive a depth up to 10cm will help retain moisture in top 15cm of soil.
For more information relating to, irrigation, optimum use, consent, good management and rules, visit the link here
For free access to Irrigation NZ resources, visit the link here.
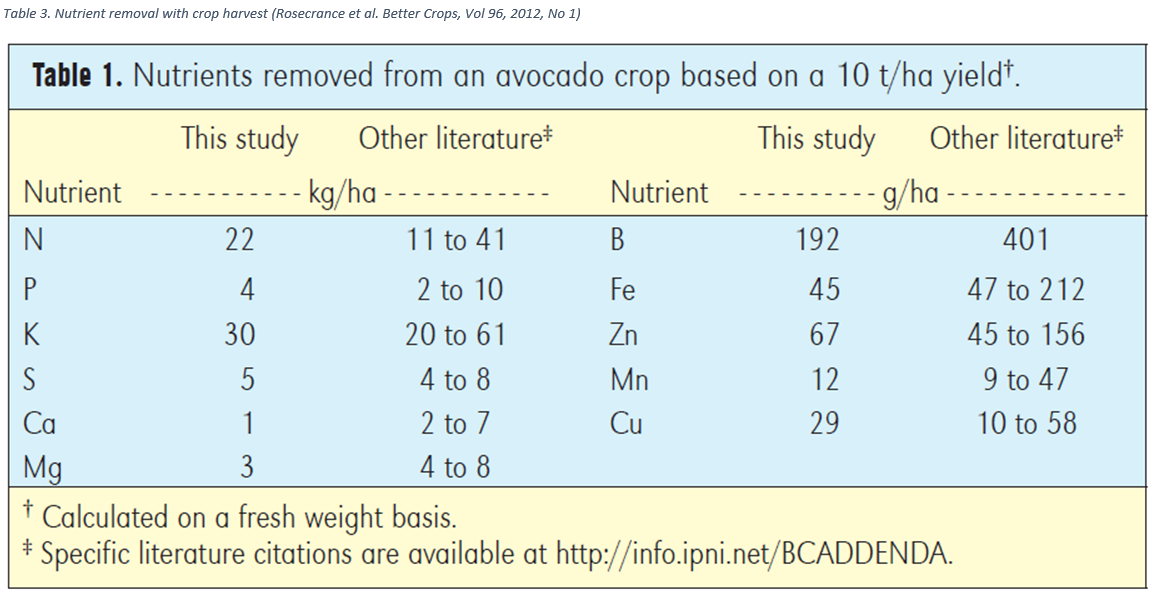
December | Remove excess fruit before end of December
Trees will naturally shed some fruit in December and again around February but removing excess fruit as soon as possible will preserve tree resources for use in fruit sizing, new leaf development and return flowering.
Target
- Fruit prone to sunburn and windrub
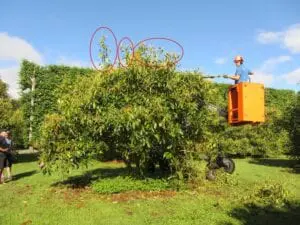
Fruit pruning being carried out in late December. Exposed fruit being targetted for removal are circled in red. - Large bunches that will harbour pests and drain alot of resource
- Areas of slow leaf flush
Outcome will be
- Improved fruit size if done early enough
- Better leaf coverage to protect remaining fruit
- Better return flowering
For a video about crop load management to reduce irregular bearing, visit the link here.
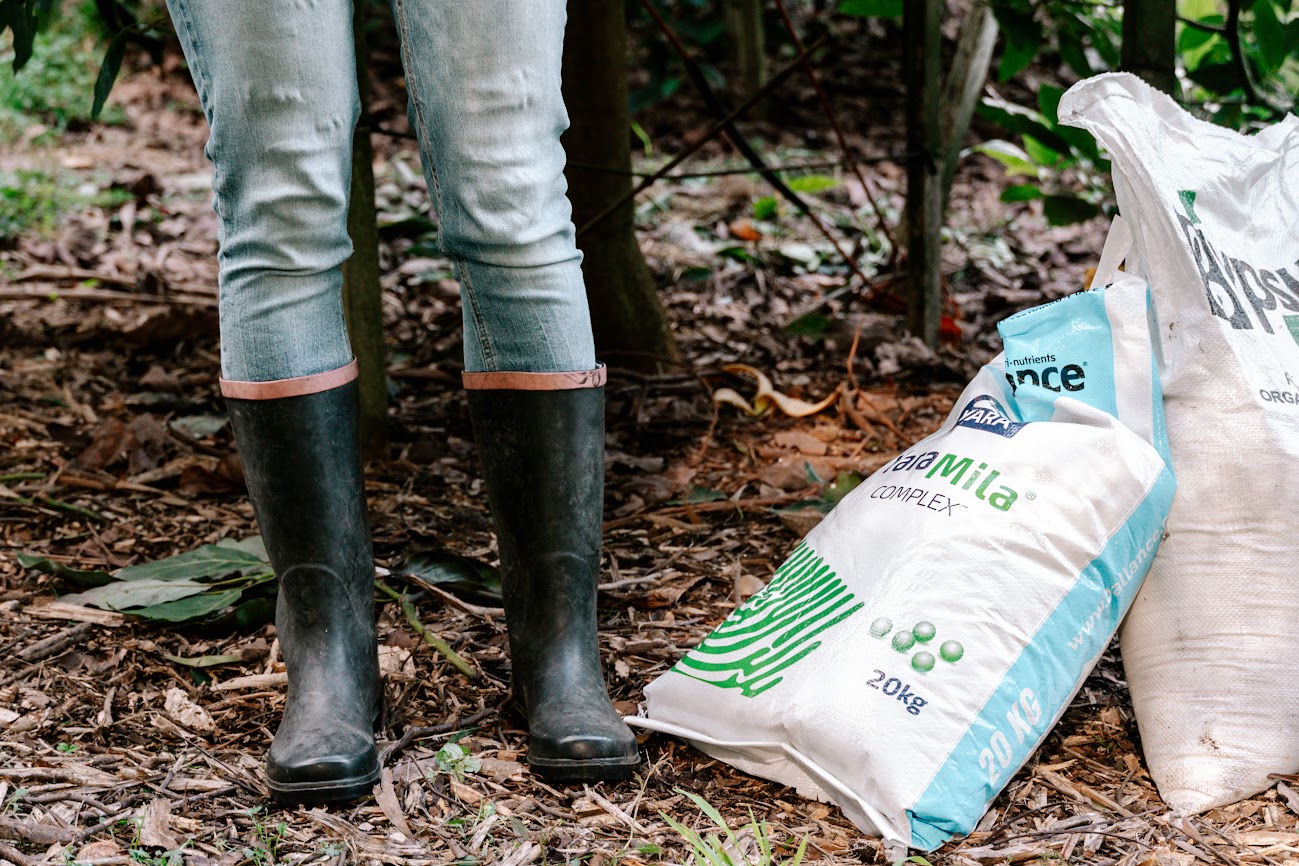
December - February | Review fertiliser plan
Ask your fertiliser consultant the following questions:
- Does my crop load match my fertiliser plan?
- What are the base soil applications I need to keep up even if I haven’t set a crop on some trees?
- Based on the crop load I’m seeing, can I reduce applications of some nutrients or do I need to put more on? Nitrogen and Potassium?
A good fertiliser should support the crop load you have not the one you thought you might have. Fruit set becomes visible in early summer and by late summer you have an indication of what proportion of the original fruit set is likely to hold through to harvest.
- Maintain fertilizer applications 4 – 6 weeks apart and time with rainfall and irrigation. 20 – 30mm of rain or irrigation is a good amount to wash in fertiliser without it draining past the majority of shallow feeder roots.
- Monitor leaf flush and fruit sizing and contact your fertiliser consultant if you have any questions or concerns about how your trees are progressing.
- If fruit set is heavier than planned then additional general fertiliser is likley warranted and additional nitrogen fertiliser may be needed to support leaf development.
- If fruit set is lighter than planned then lower fertiliser inputs are likely required. Reducing nitrogen inputs may help reduce leaf vigour and the amount of pruning required in future.
- Maturing leaves before winter is the goal as these will be the engines that support next years crop as well as this one.
For more information on nutrients and fertiliser use, click here
Autumn
Growth stages
March – April
- The leafy canopy continues to extend.
- Roots will typically flush again with white feeder roots becoming more abundant in the leaf litter.
- The following seasons floral buds start to become visible and are distinguishable from the vegetative buds by their more rounded apprearance.
- Some autumn flowering may occur but is usually minor
- Majority of leaves should be a dark green colour.
- The second and final fruit drop occurs between late March and early April. This, again is a natural adjustment of crop load by the tree.
- Carbohydrate stores start accumulating once active growth on the tree slows down in later April.
May
- Trees can start to look dormant but leaves and roots are still active.
- Fruit continues to size.
- Carbohydrate stores continue to accumulate to support Spring flowering and growth.
For a video of the phenology of a regular bearing tree, visit the link here.
For a video of the phenology of a irregular bearing tree, visit the link here.
March - May | Test soil and leaf nutrients
Leaf testing
- Ideally sample once summer flush has ceased.
- Sample youngest mature leaf that has hardened off (Dark green, waxy surface). Sample leaves from shoots that aren’t fruiting or flushing.
- Collect 4 – 8 leaves from each of 20 trees selected through block or orchard. Ensure leaves collected from the same tree are distributed evenly around the canopy (e.g. from all compass points. North, South, East and West).
- Seperate samples should be taken from blocks that differ in age, cultivar type, tree performance, soil type and fertiliser history.
- Try to send samples for analysis as soon as possible after collection.
Soil testing
- Soil sampling can be carried out at anytime but ideally avoid sampling soon after fertiliser application.
- 15cm cores should be collected from half way point between the trunk and the drip line of the tree.
- 1 core from each of 15 – 20 trees should be collected.
- Seperate samples should be taken from blocks that differe in age, cultivar type, tree performance, soil type and fertiliser history.
- If trying to diagnose a potential deficiency or toxicity then samples should be collected from the worst affected trees.
To view the Hill Laboratories Avocado crop guide on how to collect samples, visit the link here.
March - April | Prune to manage regrowth
- Prune to manage regrowth.
- Regrowth over spring and summer can negate structural pruning carried out in winter to open up canopies.
- Prune to maintain a more open canopy with good light distribution and spray and picking access.
- For videos on pruning and regrowth management visit the canopy management page here.
- Remove vertical high vigor shoots as these will rapidly shade neighboring limbs.
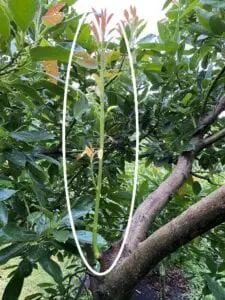
- Remove limbs growing back in towards the middle of the tree as these will create shade and structural issues.
- Where multiple new shoots have grown as a result of a previous structural cut, consider thinning to two or three shoots to reduce competition with each other.Preferentially select shoots that are growing from the inside of the branch as these are structurally stronger than those growing from the outside and are less likely to break when they become loaded with fruit.
- Remove vertical high vigor shoots as these will rapidly shade neighboring limbs.
March - April | Inject trees with phosphonate
- Root test before and 6-8 weeks after injection.
- If root test results are higher than 90mg/kg roots at 75% moisture don’t inject
- Expect levels of 25 – 45mg/kg at 75% moisture after injection. Higher is ok.
- Use 15% working solution of phosphonate and use 20ml of solution per meter of canopy diameter
- Space syringes evenly
- Don’t inject sick trees with more than recommended dose. Sick trees have a smaller root mass which acts to concentrate phosphonate. Inject at the same rate as healthy trees.
Further resources on projection of Phytopthrora
March - May | Review fertiliser plan
- Combine information from recent soil and leaf test results, crop estimates for this season and historic soil and leaf test results to review your fertiliser plan.
- Focus on whether the fertiliser plan is adequate for your crop load and whether historc fertiliser applications kept pace with nutrient removal. Can anything be learned by comparing soil and leaf test results from previous seasons with this season’s results?
Ask your fertiliser consultant the following questions:
- Does my crop load match my fertiliser plan?
- What are the base soil applications I need to keep up even if I haven’t set a crop on some trees?
- Based on the crop load I’m seeing, can I reduce applications of some nutrients or do I need to put more on? Nitrogen and Potassium?
A good fertiliser should support the crop load you have not the one you thought you might have. Fruit set becomes visible in early summer and by late summer you have an indication of what proportion of the original fruit set is likely to hold through to harvest.
- Maintain fertilizer applications 4 – 6 weeks apart and time with rainfall and irrigation. 20 – 30mm of rain or irrigation is a good amount to wash in fertiliser without it draining past the majority of shallow feeder roots.
- Monitor leaf flush and fruit sizing and contact your fertiliser consultant if you have any questions or concerns about how your trees are progressing.
- If fruit set is heavier than planned then additional general fertiliser is likley warranted and additional nitrogen fertiliser may be needed to support leaf development.
- If fruit set is lighter than planned then lower fertiliser inputs are likely required. Reducing nitrogen inputs may help reduce leaf vigour and the amount of pruning required in future.
- Maturing leaves before winter is the goal as these will be the engines that support next years crop as well as this one.
For more information on nutrients and fertiliser use, click here
March - April | Monitor soil moisture
- Ideal mulch depth is 10cm of avocado leaf or coarse mulch material
Use soil moisture monitoring to inform irrigation
Install soil moisture monitoring on the Northern (Sunny) side of a representative tree in the block being irrigated. Probes should be half way between trunk and the drip line of the tree and in a spot that irrigation reaches if the orchard is irrigated.
If using tensiometers such as Irrometer or TenTek brands
- Use 15cm probe for irrigation trigger (i.e. start irrigation system when readings below are reached)
- Bay of Plenty = -30kPa
- Whangarei = -50kPa
- Far North = -20 to -25kPa
- Use a 30cm probe to inform sprinkler volume per hour and/or length of irrigation
- Applying 20 – 30mm of water per irrigation is a good starting point
- Work out how many mm of water your sprinklers apply using the formula (mm/hour =(sprinkler volume L/hr) ÷(π X radius of sprinkler throw²)
- e.g sprinkler head delivering 100L/hr with a radius of 4m
- mm/hr = (100) ÷ (3.142 X 4²)
- mm/hr = 100 ÷ 50.3
- 1.99mm/hr
- So a 100L/hr sprinkler with a throw of 4m radius will deliver 1.99mm of water every 1 hour the irrigation system is run. To deliver 20mm of water the irrigation system would need to be run for 10 hours.
- If the 30cm probe is drying beyond the trigger point before the 15cm probe → increase volume of water by changing sprinkler head to higher flow rate or irrigating for longer.
- If the 30cm probe is reading a lot lower than the 15cm probe indicating the soil at 30cm is alot wetter than the 15cm soil → Decrease volume of water delivered at each irrigation by changing sprinkler head to lower flow rate or irrigate for a shorter period. You may need to increase frequency of irrigation events but decrease the volume of water delivered at each irrigation.
- Addition of mulch up to acheive a depth up to 10cm will help retain moisture in top 15cm of soil.
For more information relating to, irrigation, optimum use, consent, good management and rules, visit the link here
For free access to Irrigation NZ resources, visit the link here.
Winter
Growth stages
June – August
- The tree may appear dormant but this is the key period when stored carbohydrates are accumulated to support future growth and fruit production.
- Fruit continue to size at a linear rate.
For a video of the phenology of a regular bearing tree, visit the link here.
For a video of the phenology of a irregular bearing tree, visit the link here.
April - June | Fertiliser planning
- If you haven’t already done so, combine information from recent soil and leaf test results, crop estimates for this season and historic soil and leaf test results to review your fertiliser plan.
- Focus on whether the fertiliser plan is adequate for your crop load and whether historc fertiliser applications kept pace with nutrient removal. Can anything be learned by comparing soil and leaf test results from previous seasons with this season’s results?
Ask your fertiliser consultant the following questions:
- Does my crop load match my fertiliser plan?
- What are the base soil applications I need to keep up even if I haven’t set a crop on some trees?
- Based on the crop load I’m seeing, can I reduce applications of some nutrients or do I need to put more on? Nitrogen and Potassium?
A good fertiliser should support the crop load you have not the one you thought you might have.
For more information on nutrients and fertiliser use, click here
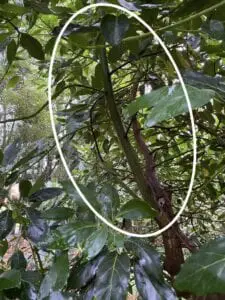
June - September | Structural pruning
- Prune to maximize light interception.
- Closer tree spacing will mean trees need to be kept smaller to avoid shading. A good rule of thumb is to not let tree height reach above 70% of row width (e.g. if trees are spaced 10 metres apart, do not let them get higher than 7 metres).
- Windows, ‘V’s and vase shapes can all be used to maximize light interception. Light will not penetrate more than 1.5 metres through a canopy. Choose a style that makes sense to you and fits the other common principles of pruning below.
- Prune for both spray and harvesting access.
- Picking efficiency and good pest and disease control will improve profits at the end of the season. Downgraded fruit through pest damage is a lost opportunity and picking costs make up a significant proportion of on-orchard cost. Pruning for access generally goes hand in hand with pruning for light but think about how pickers are going to access fruit. Are there a lot of smaller limbs making access more difficult than it needs to be? Are there low sweeping limbs that will impede hydralada access, slowing them down, that could be removed?
- Prune to rejuvenate the tree.
- This is tree dependent but ultimately think ahead to how pruning now is going to help create productive wood this year, next year and the year after that.
- For a sick tree, refrain from pruning too many leaves until spring. Prune as much fruit off as possible to remove the drain on resources. Leaving as many leaves as possible on the tree until spring will help the tree harvest energy over winter to support new growth in spring. The tree will grow back with more vigor when pruned in the spring than if you prune it in winter.
- For a dark tree that has little or no growth on the inside of the canopy. Cut holes in the canopy to allow light into the middle of the tree. Maintain these holes to ensure new growth doesn’t shoot away too vigorously as a result of becoming shaded. These new growth points will give you extra surface area to produce fruit and give you options to cut back to in the future.
- For a healthy tree, make cuts that give you complexity and different ages of wood. Cutting the tip of more vigorous shoots will cause them to branch, giving more potential fruiting points. Cuts that create new bud break will produce young wood that will likely be productive in future. A tree with different aged wood is less likely to be irregular bearing.
- Prune to manage crop load.
- It is tempting to leave fruit on trees this close to harvest but if the fruit is likely to become sunburnt before harvest or unlikely to size up, remove the fruit. This will improve your medium term profits by sacrificing some poor crop this year for better quality crop in future years.
- If limbs need to be pruned to meet the other common principles above, don’t be shy to drop fruit on the ground. If you need the fruit to keep the bank manager at bay then hold onto it but recognize you will likely need to go twice as hard with your pruning next year.
- Alternatively you can mark limbs you’d like to prune and get harvesters to strip pick the marked limbs on the first pick and then you can prune them out.

For information relating to canopy management, visit the link here.
June - September | Watch for water logging
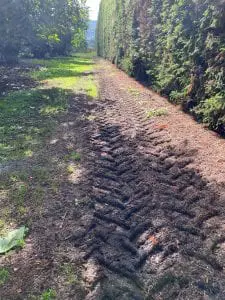 Soil moisture is generally at its maximum through winter. This makes it an ideal time to identify areas of poor drainage that might affect tree health. Pooled water or tire tracks left in the soil are signs of a water logged soil. By identifying these areas you might be able to intercept the water where it enters the block and divert it elsewhere or consider other drainage options. It may also help explain areas of lower tree health.
- Avoid operating machinery in areas of water logged soil as this will quickly compact soil.
June - August | Irrigation system maintenance
- The best time to carry out maintenance on your irrigation system is when you’re not using it.
- Check pumps, filters, irrigation lines and sprinklers and arrange any work that needs to be done ahead of spring. This is especially important in this time of disrupted international parts supply and high demand for new irrigation systems.
- Consider if your sprinkler heads are appropriate for your size and health of tree. High crop load trees will have a higher water demand so be mindful of this when adjusting sprinkler heads.
For free access to Irrigation NZ resources, which include maintenance checklists, visit the link here.
June - November | Frost protection
- Frost damage is cumulative so anything that can be done to minimise frost should be done.
- Cold air drainage is a great passive frost protection measure. This might be as simple as pruning the bottom meter of shelter to allow cold air to drain into a nearby gully.
- Maintaining good nitrogen levels in leaves can help trees resist frost so talk to your consultant or fertiliser planner about whether foliar low-biuret urea might be worth applying if leaves begin to yellow.
- Other products such as copper, which prevent ice crystals forming on leaves, can also help.
- Use of frost fans relies on inversion layers of warm air and only effect a certain area of the orchard, dependent on their size. Careful consideration should be given to whether a fan is appropriate for your orchard and where best to locate it.
- Overhead sprinklers can help fight frost but ensure pulse frequency is adequate to protect the desired blocks with a minimal amount of water. Water logging can damage root systems and if not managed well, this form of frost protection can cause more harm than good.
For information relating to frost protection, visit the link here.
July - August | Prepare ground for new plantings
- Spring can often be too wet and too busy to prepare new planting sites as you would like, so take advantage of winter if you can. Avoid operating machinery if soils are water logged as this will compact the soil.
- Soil nutrient testing and amendments can be carried out and it may be possible to establish shelter, irrigation and drainage before spring.
To access the grower manual section relating to orchard establishment, visit the link here.
To access the planting guide, visit the link here.
July - August | Install soil moisture probes
- Many soil moisture probes disturb the soil when they are being installed. By installing probes in winter, the soil has time to settle back down to give more representative readings.
- Some soil moisture probes such as tensiometers do not take long at all to settle so when best to install probes will depend on the probes you are using.
For information relating to soil moisture management, visit the link here.
For free access to Irrigation NZ resources, visit the link here.